 So the summer is sadly over and the long hot days are finished for another year, but still never mind it has been a great summer for a change. By the time you read this we will be in the middle of autumn and with it hopefully lots of amazing autumnal colours to include in our landscape photography images. If you want to try something different, and add a bit of the “wow” factor to your shots,why not consider trying stitched Panoramics .They are fun and can give your shots a very individual look.
Panoramic Images
I like Panoramic photography, which means stitching two or more images to one larger Panoramic (Pano) Image. I had a few images that I wanted to print to a larger size like this pano of St Mawes. To get really large prints and still keep a high detail level I ended up stitching several images together. The concept behind stitching is that you combine two or more overlapping images to one big Panoramic Image and then you will have more resolution for an enlargement. With today’s advanced programs it is getting easier because the process is almost automated and the algorithms behind the scene are good and powerful. The most important part is getting your field work done properly and bring home some images that are sharp, overlapping and interesting then finally you will be able to stitch together.
Here is an example of the process of stitching twelve vertical images together to create a large panorama of St Mawes, taken from across the water. The final image is close to 160ft long compared to the normal 2ft with a full frame DSLR. Basically it means you can print it twelve times as big. Of course you can size the image to any size you want before printing, you are not stuck with just the one size, I mostly print this image at 6ft long and it looks amazing with its’ detail.
In this instance I used the program panorama factory to stitch the twelve vertical shots into one. To get the best images from the location I used the 70x200mm f@4 set vertically on the Really Right Stuff tripod, 55ball head, and dedicated multi row-shot panoramic head. To produce acceptable panoramas the shooter simply needs to keep two things in mind and work within the basic constraints. Keep it level: Keep the camera level as you pan left/right. This is critical and can be accomplished in a variety of ways. One is to fit a bubble level on top of the camera, the other is to buy a dedicated Panning Clamp. Sometimes you can get into trouble and the panoramic programs will fail from time to time and it can be quite complex to stitch images together. Even when you think you have finished the field work properly you can run into problems which obscure the process. It can also be difficult to get the composition right at times because you will have to imagine the final panorama but in the camera you can only see one image at the time!
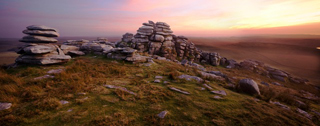
 Here is another example of a landscape panorama. It was taken late in the evening last summer on Bodmin Moor at about ten o’clock as the sun was slowly disappearing over the horizon. I shot three horizontal images and stitched them together in photoshop CS6. This time I used a shift lens rather than the normal panoramic head. There are advantages and disadvantages with using a shift lens to create stitched panoramas. If you have a tilt-shift in your arsenal of glass, you can use the shift function to achieve wonderful panoramic images. There are three key advantages to using a tilt-shift lens to create stitched-image panos.
[1] You don’t need to worry or adjust for parallax.
[2] The stitching process is dead-simple for the computer.
[3] No special support gear is required.
When shooting images for tilt-shift panos, be aware that the corners of the images will vignette at the extreme shift positions. You can keep the lens shift inboard 1 or 2 mm from the extreme limit or deal with the vignette in the computer via cropping or localised exposure adjustments. Be very careful if you are up in the moors taking photographs, especially if it is dark, it’s very easy to lose your bearings and get lost. On this occasion I was there with a shooting buddy Mark, he is a photographer who lives in north Cornwall. We arrived in the light at the nearest car park to Rough-Tor, then hiked around for a couple of miles until we found the composition we were happy with.
As always with photography it’s easy to get caught up in the moment then forget about things like getting back safely. We thought that finding the way back would be easy, this was a big mistake as Bodmin Moor takes on a completely different look and feel after the lights go out. We knew which general direction to head for, but as we had a series of streams, bridges and peat bogs to navigate around we lost our bearings and found ourselves lost, then wading through thick muddy bogs up to our knees in the pitch black, coming across razor wire that keeps the sheep in.

After a few hours of this we were feeling a bit cold and desperate and got to the point of thinking about finding a dryish place to kip down for the night, a thought I would rather not think about. Lucky for us Mark had his mobile with him and managed to get a signal to the outside world. He rang his father who drove to the car park where we had parked and he kept flashing his car head lights to give us a direction to head in, it worked and we got back safely, cold wet and covered in thick slimy mud. These days when I go out on the moors at night I take a big flash light,mobile phone, and plenty of chalk to mark my trail so that the flash light can spot it on the way back.
Of course stitched panos don’t have to be shot with only horizontal panning/shifting. Here is an example of a black and white image using two shots stitched together panning/shifting upwards creating a square finish which is very popular these days. All the information is the same as above, you add as many shots as you want and make them as tall as you want them to be.
I have just had some very good news via an e-mail. I have been told that I have been awarded a place in this year’s landscape photographer of the year. The image was shot on the Isle of Skye, Scotland. It is a three minute black and white long exposure. The competition is considered to be the best in the country with all the top professionals entering their best images. There will be a large book published on the 1st November, and an exhibition of the winning photographs at the National Theatre Exhibition London. I feel very honoured and humbled to be chosen for this award as it represents the cutting edge in modern landscape photography which reveals the British Isles in all its glory.