Hello everyone and welcome to February’s Photographic In-Sights. I thought this month I would give you my top 10 tips for learning photography.
With Digital photography it costs you nothing to take a picture, so the thing that will teach you the most about you and your camera is experimentation. Try taking pictures from different perspectives; try taking a picture low to the ground or as high up as possible. Move around your subjects, look at the sides and how the light changes as you move. Get in extremely close or move right back.
2. Hold the camera straight
Make sure you keep your horizons level or your verticals vertical. One of my pet hates is sloping horizons. However, a picture that is deliberately at an angle can add a certain energy

3. Check your backgrounds
Get into the habit, before you press the shutter, of having a quick look around in the background and make sure there aren’t any things untoward, like a lamppost growing out of your subjects head. A step to one side can very often fix these issues, but if you don’t notice them at first, it could ruin a lovely image
4. Get in close
Just because you can see you subject in the frame, they could well appear distant when you go to review your images. Try taking a few steps forward, or, if you have a zoom, try the picture at a few different zoom levels to see how the picture changes
This is something I can be bad at. When you are in a beautiful place with your friends, make sure you get a picture with your friends in it! When you look back at the images in the years ahead, chances are it’s the time you spent there with the people you were there with that you’ll want to remember, not just the place. On the other hand, don’t get carried away and only take pictures of your friends. You’ll also want to remember the sites you’ve visited.
6. Have a focal point
Try to identify what it is, in the picture you’re taking, that will draw the eye of viewer. Interesting pictures have interesting things in them.
7. Rule of thirds
Imagine a grid of two horizontal and two vertical lines, evenly dividing your image, and try and place the subject in the intersection of these lines. I talked about this in greater depth in last month’s article.

8. Hold your camera properly
Camera shake can blur your images, especially indoors in low light situations. Use your right hand to grip the right hand side of the camera and your left hand to support the camera or lens. Tuck your elbows in, breathe in deeply and gently, and then hold your breath and squeeze the shutter (don’t jab at it). You can also try leaning against something, or place the lens against something solid to steady yourself.
9. Don’t be afraid of ISO
Up your ISO to get the shot without blurring. A grainy image that is sharp is generally a lot better than a blurry one.
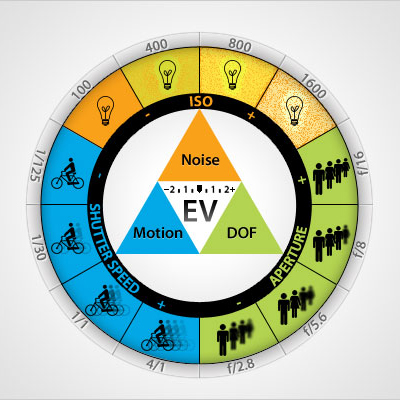
10. Understand the Exposure Triangle
It’s a really good idea to understand how the exposure of an image depends on you balancing the ISO, Aperture and Shutter of your camera. One of the best diagrams and explanations for this that I’ve seen can be found here: http://www.exposureguide.com/exposure.htm


